



Deploying n8n on a private server via Docker is the most efficient way to achieve unlimited workflow automation without recurring platform subscription fees.
This guide covers setting up a secure, production-ready n8n instance configured with a custom domain name and automatic SSL certificates (HTTPS).
Setup Scheme
Request flow: browser to reverse proxy to n8n, with automated SSL and persistent storage
All traffic terminates HTTPS at Caddy; n8n itself is never exposed directly to the internet.
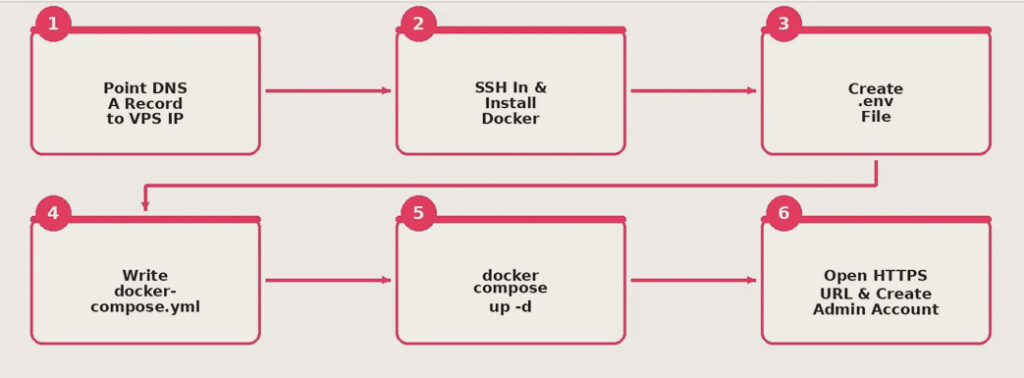
The deployment follows six sequential steps: point your DNS A record to the VPS, install Docker over SSH, define environment variables, write the docker-compose.yml file, launch the containers, then open the HTTPS URL to create the admin account.
Integration Scheme (Architecture)
Request flow: browser to reverse proxy to n8n, with automated SSL and persistent storage
All traffic terminates HTTPS at Caddy; n8n itself is never exposed directly to the internet.
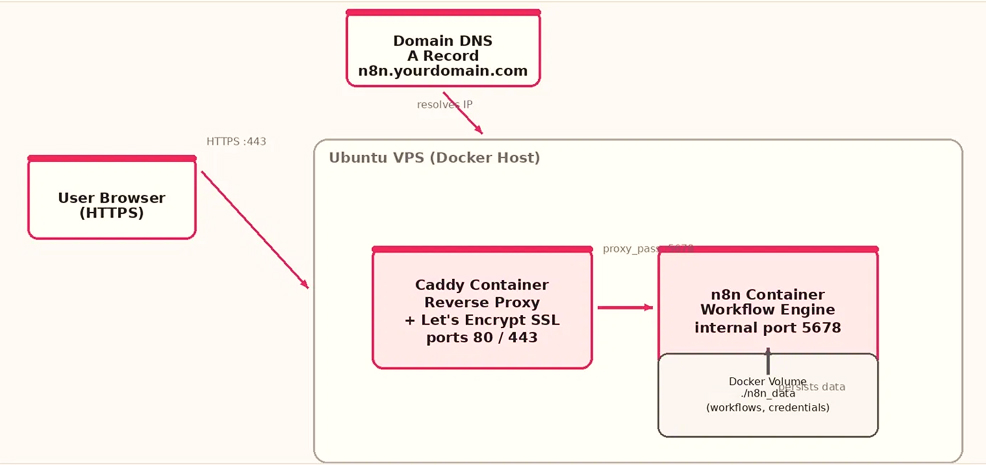
The DNS A record resolves your domain to the VPS. All browser traffic hits the server over HTTPS and is terminated by the Caddy container, which automatically issues and renews a Let’s Encrypt SSL certificate and reverse-proxies requests internally to n8n on port 5678. n8n itself is never exposed directly to the internet. Workflow and credential data persist outside the container in the ./n8n_data Docker volume, so upgrades or restarts don’t wipe your setup.
Prerequisites:
- An Ubuntu 22.04 / 24.04 LTS VPS (1–2 vCPUs, 2 GB RAM minimum).
- A custom domain or subdomain (e.g., n8n.yourdomain.com).
- Access to domain DNS records.
Step 1: Point Domain DNS to the VPS
Configure DNS settings before server installation.
In the DNS management panel of your domain provider, add an A Record:
- Name / Host: n8n (or @ for root domain)
- IPv4 Address: Your VPS IP address
- TTL: Auto
Step 2: Connect to the VPS and Install Docker
Connect via SSH.
Access the server via terminal:
ssh root@YOUR_SERVER_IP
Update system packages and install Docker with Docker Compose:
# Update package lists
sudo apt update && sudo apt upgrade -y
# Install required dependencies
sudo apt install -y curl git docker.io docker-compose-plugin
# Verify installation
docker –version
docker compose version
Step 3: Create Project Directory and Environment Files
Create environment variables.
Create a project folder and navigate inside:
mkdir ~/n8n-docker && cd ~/n8n-docker
Create the .env environment file:
nano .env
Paste the following environment variables (replace placeholder domain and email values):
DOMAINS=n8n.yourdomain.com
SSL_EMAIL=your-email@example.com
N8N_ENFORCE_SETTINGS_FILE_PERMISSIONS=true
Save with Ctrl + O, confirm with Enter, and exit with Ctrl + X.
Step 4: Create the docker-compose.yml File
Configure Caddy as a reverse proxy for automated HTTPS.
Create the main configuration file:
nano docker-compose.yml
Paste the container setup:
version: ‘3.8’
services:
caddy:
image: caddy:latest
restart: unless-stopped
ports:
– “80:80”
– “443:443”
volumes:
– ./caddy_data:/data
command: caddy reverse-proxy –from https://${DOMAINS} –to n8n:5678
n8n:
image: docker.n8n.io/n8nio/n8n:latest
restart: unless-stopped
environment:
– N8N_HOST=${DOMAINS}
– N8N_PORT=5678
– N8N_PROTOCOL=https
– NODE_ENV=production
– WEBHOOK_URL=https://${DOMAINS}/
– GENERIC_TIMEZONE=Europe/Bratislava
volumes:
– ./n8n_data:/home/node/.n8n
Save and exit (Ctrl + O, Enter, Ctrl + X).
Step 5: Launch the Docker Containers
Run containers in detached mode.
Start the services in the background:
docker compose up -d
Allow 1–2 minutes for Caddy to issue the Let’s Encrypt SSL certificate and initialize n8n.
Step 6: Access the Instance and Set Up Admin Account
Browser setup.
Open a web browser and navigate to: https://n8n.yourdomain.com
Follow the on-screen prompt to set up the primary administrative email and password.
Basic Server Maintenance Commands
View live container logs:
docker compose logs -f
Upgrade n8n to the latest release:
cd ~/n8n-docker
docker compose pull
docker compose up -d
Back up workflow and credential data:
All application configurations are stored inside ~/n8n-docker/n8n_data. Copying this directory creates a full environment backup.